
📢 Introduction
As the owner of several Business Central apps on AppSource, keeping them up-to-date is a constant priority. One crucial requirement for publishing updates is digitally signing the app. Since 2021, I’ve been using a digital certificate in the form of a *.pfx file for this purpose. However, my current certificate is set to expire in December 2024, so it was time to renew or replace it.
What I discovered is that the process has become more complicated. The world of digital security has shifted towards more stringent standards, making it harder for developers like me to navigate. Dmitry Katson wrote an insightful article earlier this year titled Code Signing in 2024 detailing these changes. In short, certificates have become more secure, more expensive, and, unfortunately, less cloud-friendly. However, Dmitry pointed out a workaround: it’s still possible to find cloud-optimized certificates compatible with Azure Key Vault.
At the time of his article, GlobalSign was a recommended provider, offering certificates for 279 EUR in Europe. While this seemed like a viable option, there’s an additional cost associated with using a premium Azure Key Vault, which operates on a usage-based pricing model. Unfortunately, I couldn’t pinpoint the exact costs, but it was clear this approach might be expensive over time.
Looking for alternatives, I turned to the ever-helpful #msdyn365bc community on the Bluesky social network. The response was immediate, and I discovered a better solution: Microsoft Trusted Signing. This service costs around $9.99 per month and offers a more affordable and streamlined approach.
Here’s a step-by-step guide on how I set it up to sign my apps locally.
First step is to Create a Trusted Signing account:

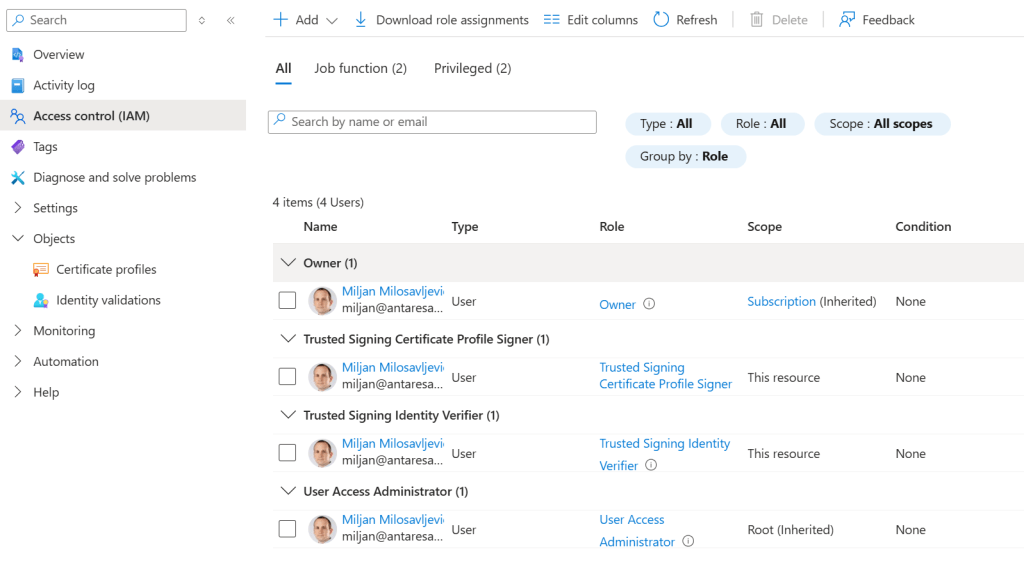
After a Trusted Signing Account has been created, we have to assign two roles:
⚠️Trusted Signing Identity Verifier
⚠️Trusted Signing Certificate Profile Signer
This is described in this article: Assign Roles for Trusted Signing
A new identity has to be created inside of a Trusted Signing Account: Create an identity validation request. I created a Public identity. I had to wait for less than a day for the identity to be validated. This allowed me to proceed. I only had to take one action to get the validated identity and that is to click on a link received through email.
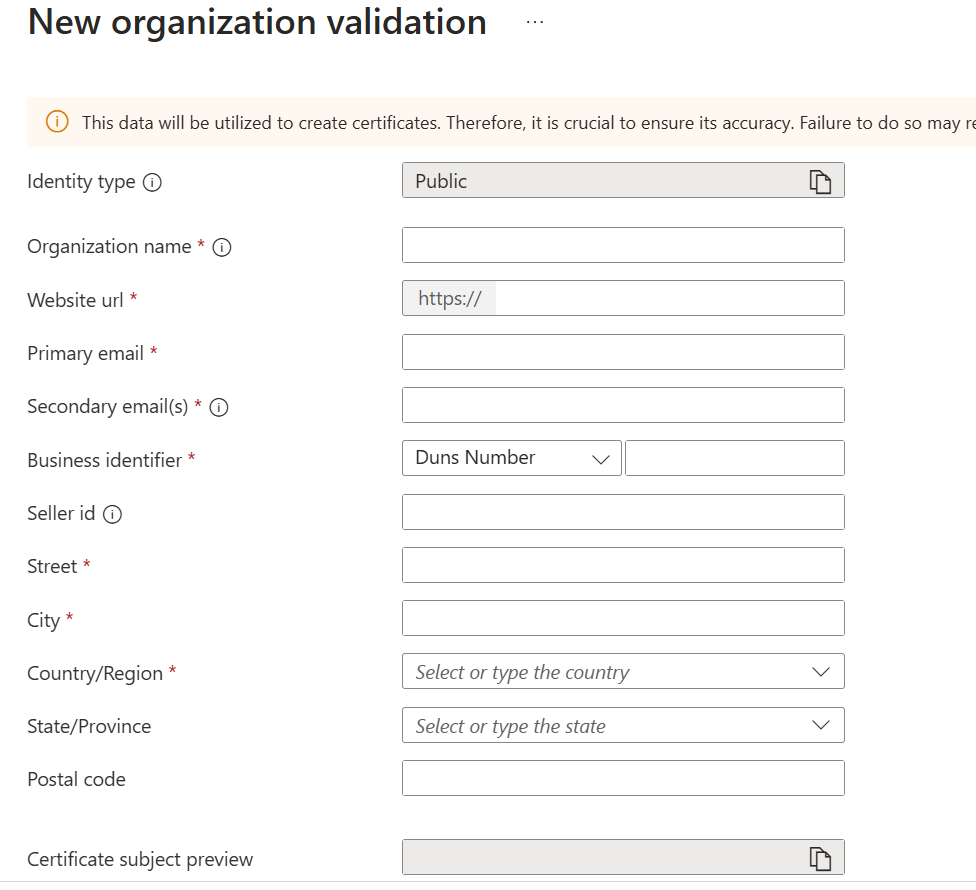
After identity is validated, a next step is to Create a certificate profile. I used the Public Trust. In the form there are only few fields to enter:
- A name that has to be unique;
- Verified CN and O – just select previously validated identity;
- Include street address – I skipped this option;
- Include postal code – I skipped this option.

With the Certificate Profile successfully created, the process of acquiring a code signing certificate is complete, and it comes with a subscription cost of $9.99 per month.
If you want to test code signing via the command line, one way to do it is:
- Download and install SignTool – I had it already on my computer
- Download and install .NET 8.0 Runtime – I had it already on my computer
- Download and install the Trusted Signing dlib package – I have downloaded the dlib package and put it in the folder that I have selected.
After downloading the necessary packages, we proceed with the installation. Next, we use the installed SignTool to code sign the app. This involves creating a JSON file and then using SignTool to sign the file.


💡 Thoughts or feedback? Is there something better out there?

It looks like MS has limited access to Trusted signing:
When trying to create a Trusted signing account, I get :
“At this time Trusted Signing is only available to organizations based in the USA and Canada that have a verifiable history of three years or more.”
LikeLike
Well, that is new. The documentation has been updated on 09.04.2025.
The Link:
https://github.com/MicrosoftDocs/azure-docs/commit/2340e68675819a34d20725f5a9094bab708a2076
I can confirm it worked so far for Serbia and Germany. I am wondering if this documentation change affects already created Trusted Signing Accounts.
LikeLike
Hello,
Thanks for this post, do you use it on a pipeline ?
LikeLike
Yes, it can also be used in Pipelines. We use it inside of Azure Pipelines but I know it should also work with AL-GO
LikeLike
and through azure key vault ?
LikeLike
As far as I can tell people are using it with Azure Key vault. I have not tried it myself though. https://github.com/microsoft/AL-Go/issues/1134
LikeLike
It didn’t work for me. Tried lot many ways, but end up File not found error. It seems Azure Trust signing does not recognizes .app files.
Confirmed it with ChatGpt as well
Short answer: No — you generally cannot use Azure Trusted Signing to sign a
.appfile (Business Central extension) directly.Here’s the real situation 👇 🔹 What Azure Trusted Signing actually supports
Microsoft Azure Trusted Signing is designed for:
.exe.dll.msi.ps1,.vbs, etc.Basically: standard Windows Authenticode signing formats
LikeLike
It didn’t work for me. Tried lot many ways, but end up File not found error. It seems Azure Trust signing does not recognizes .app files.
LikeLike
Be critical when using AI tools for this process. I can confirm that *.app files generated by the AL Language extension work without problems with Azure Trusted Signing. If you’re getting a ‘File not found’ error, the issue is likely not with the .app file itself but somewhere else in your setup.
LikeLike
I am getting this error: SignTool Error: This file format cannot be signed because it is not recognized. SignTool Error: An error occurred while attempting to sign: D:\AL Development\Tinx-IT_Tinx Customer Portal_28.0.0.0.app Do you kwno what the reason might be?
LikeLike